 FreeLUG
Association nationale rassemblant les passionné·e·s de la brique LEGO®. Depuis 2003
FreeLUG
Association nationale rassemblant les passionné·e·s de la brique LEGO®. Depuis 2003
 Third-party sensors: a review of some Hitechnic’s sensors
Review of an infrared proximity sensor, an accelerometer + / - 2g, a magnetic compass, and a color sensor.
HiTechnic
HiTechnic manufactures a range of robotic sensors for the LEGO® MINDSTORMS® NXT. The majority of HiTechnic sensors are certified by The LEGO Company assuring the highest standards of quality and safety.

HiTechnic manufacturers sensors that are certified by The LEGO company guaranteeing:
![]() 100% compatible with Mindstorms NXT
100% compatible with Mindstorms NXT
![]() Meet the highest LEGO quality standards
Meet the highest LEGO quality standards
![]() Comply with all safety standards
Comply with all safety standards
![]() RoHs Compliant (certified lead free)
RoHs Compliant (certified lead free)
The software procedures for accessing data from these sensors are directly included in the latest version of Bricxcc. To be able to use it, you will need a PC with Brixcc, NBC/NXC, and a NXT brick with the « enhanced firmware by John Hansen »

- Capteurs Mindstorms
- Capteurs hitechnic et LEGO NXT1.0
NXT EOPD
This sensor accurately detects the proximity of objects. The EOPD (or Electro Optical Proximity Detector) uses an internal light source to detect the presence of an object and determine the distance between the object and the sensor. By generating its own light source (modulated), the sensor is able to filter out external light intensities. Passing from a bright to a dark environment, or through shadows, the EOPD sensor automatically compensates and only returns the value from the extent of its own source. Targets can be detected precisely from 2 cm to 20cm, and measures mainly depend on the size and shape of the detected object and its surface state (more or less reflective).

This sensor can be used as a standard light sensor, which can activate or deactivate the light source, as required. As for the standard light sensor, turn off the internal light source directly affects the distance measured by the EOPD. It’s only usefull when using measurement percentage, because even when measuring long range (light source activated), the resolution is good for short distances.
Using this sensor can be achieved by using standard NXC procedures SetSensorType(), SetSensorMode(), SensorRaw() et Sensor(). An example to illustrate the use, provided by the supply of HiTechnic (thanks Gus).
Procedures are already available in Bricxcc to use the sensor:
- SetSensorHTEOPD() initializes the sensor, the choice of the activation of light source being left by IN_TYPE_LIGHT_ACTIVE or IN_TYPE_LIGHT_INACTIVE.
- SensorHTEOPD() returns the measured value, raw. See the code example at the end of the article ...
NXT Acceleration / Tilt Sensor
The accelerometer sensor contains a component capable of measuring acceleration along three axes x, y, z.
The measuring range of acceleration is-2g to +2 g with a resolution of 200 increments per g, and a refresh of the extent of 100 Hz (100 steps per second).
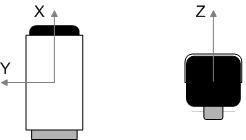
This sensor can also be used as a position sensor, static, because then it measures the acceleration of gravity, and therefore by inference, the position of the mobile.
This sensor uses NXT’s I2C interface, and require a minimum firmware of 1.03. To test your new sensor, plug it into port 2 of your NXT and select View > Ultrasonic cm > Port 2. Hold the sensor level in your hand and slowly tilt it forward and back. The value displayed on the NXT will represent the acceleration or tilt value for the x axis (the last 8 bits of x) and will be in the range of 0 - 254.
Sensor Register Layout
As the acceleration is coded on 10 bits, the measure requires 2 8-bit registers.
| Adress | Type | Contents |
|---|---|---|
| 42H | byte | X axis upper 8 bits |
| 43H | byte | Y axis upper 8 bits |
| 44H | byte | Z axis upper 8 bits |
| 45H | byte | X axis lower 2 bits |
| 46H | byte | Y axis lower 2 bits |
| 47H | byte | Z axis lower 2 bits |
Using this sensor can be achieved by using standard NXC procedures SetSensorLowSpeed() et I2CBytes(). An example to illustrate the use, available on the HiTechnic website.
Procedures are already available in Bricxcc to use the sensor:
- SetSensorLowspeed() initializes the I2C communication with the sensor.
- ReadSensorHTAccel(port, x, y, z) returns a boolean of success, and the three acceleration values. See the code example at the end of the article ....
NXT Compass Sensor
The NXT Compass Sensor contains a digital magnetic compass that measures the earth’s magnetic field and calculates a heading angle. The current heading is calculated to the nearest 1° and refreshed 100 times per second.
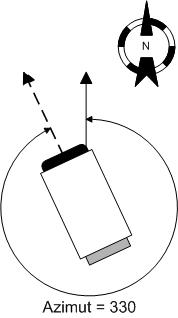
The Compass Sensor connects to an NXT sensor port using a standard NXT wire and uses the digital I2C communications protocol. To test your new sensor, plug it into port 2 of your NXT and select View > Ultrasonic cm > Port 2. As you swing the sensor around, you’ll notice that the readings will change from 1 - 179. (it’s heading2, half of the heading, rounded +/-1, cf infra)
Sensor Register Layout
| Adress | Type | Contents |
|---|---|---|
| 42H | byte | heading2, two degree heading |
| 43H | byte | heading1, one degree adder |
| 44, 45H | word | heading16,(lowbyte, highbyte) |
Two methods to calculate the heading:
heading = heading2 * 2 + heading1 requires 2 cycles of reading, unsigned heading or heading = highbyte * 8 +Lowbyte , signed heading , but memory footprint of 16 bits.
The compass must be used horizontally to function properly. Remember this when building your robot and sensor placement. It must be firmly hooked, otherwise measures will be erratic. HiTechnic recommends that the compass must be at least 15 cm away from the motors, and 10 cm away from the NXT brick.
Procedures are already available in Bricxcc to use the sensor:
- SetSensorLowspeed() initializes the I2C communication with the sensor.
- SensorHTCompass() returns the value of the azimuth. See the code example at the end of the article ...
NXT Color Sensor V2
The new and totally redesigned HiTechnic Color Sensor Version 2 (V2) operates by using a single white LED (light emitting diode) to illuminate the target and analyses the color components of the light reflected by the target’s surface and calculates a Color Number that is returned to the NXT program.

This sensor uses NXT’s I2C interface, and the Color Number calculated by the sensor is refreshed approximately 100 times per second.
Sensor Register Layout
| Adress | Type | Contents |
|---|---|---|
| 42H | byte | Color number |
| 43H | byte | Red reading |
| 44H | byte | Green reading |
| 45H | byte | Blue reading |
Procedures are already available in Bricxcc to use the sensor:
- SetSensorLowspeed() initializes the I2C communication with the sensor.
- SensorHTColorNum(port) returns the value of Color number.
- ReadSensorHTRawColor(port, rouge, vert, bleu) returns the RGB readings.
- ReadSensorHTColor(port, index, rouge, vert, bleu) returns the value of Color number, and the RGB readings.
See the code example at the end of the article ...
Code example
The second part of the paper will be on the practical use and performance of sensors, compared with my sensors “home-made”.
A big thank you to Gus, from the technical support of HiTechnic, who answered to all my questions in less than a day.